
How to back up a Windows DHCP server
One of the simplest but most important services on a network is the Dynamic Host Configuration Protocol service. Some DHCP configurations are complex, consisting of many reserved addresses, custom settings and additional options.
As with any service containing extensive customizations, DHCP must be backed up regularly.
In its most basic configuration, DHCP lets client devices lease IP address configurations, enabling them to participate on the network. Common DHCP configurations include the following:
- IP address.
- Subnet mask.
- Default gateway or router.
- Exclusion range.
DHCP includes many configuration options for various scenarios, such as server identities, name resolution server IPs and domain name information. Different options exist for IPv4 configurations versus IPv6.
Another common scenario is operating system deployment using Preboot Execution Environment (PXE) servers. Client devices with either an old or no OS installed might boot from a network interface card and request an IP address via DHCP. These devices also attach a query for a PXE server so that they can receive a deployment image from it. Many administrators configure their DHCP servers with PXE server information, and it is this additional customized information you might want to back up.
With so much time and effort invested in DHCP services for IPv4 and IPv6, it only makes sense that DHCP administrators should back up their configurations.
The Windows Server DHCP administrative console provides the ability to do just that. This tutorial explains how to back up DHCP configurations on Windows Server devices. It also discusses restoring those services after an outage.
Open the DHCP console
The DHCP administrative console provides an interface to DHCP server configurations. Access the console from the Tools menu of Server Manager.

The console shows the local DHCP service, with the top node being the server. Expand this node to display the IPv4 and IPv6 sections. You might drill down into each of these to view information on a per-scope basis.

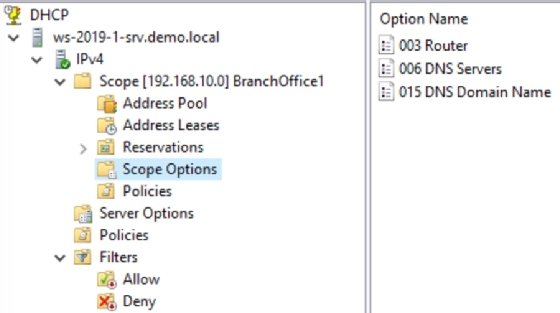
A configured DHCP server will display one or more scopes — ranges of available IP addresses — and scope options. Note that there are server-wide options containing settings that apply to all DHCP clients of that server, as well as scope-specific options that apply only to clients that lease IP configurations from a given scope.
These scope options include time servers and domain information.
The following screenshot displays client IP address reservations.
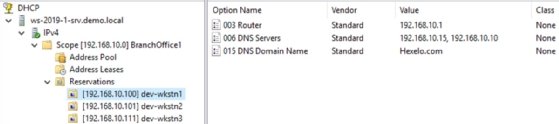
Administrators reserve IP address configurations for client devices that require specific settings. These settings might be a consistent IP address, but could also be a router or other specifications, depending on the device’s role. Scopes containing many reserved addresses certainly justify backups.
How to back up a DHCP server
Now that you understand the likely complexities and high degree of customization available with DHCP, you can appreciate the need to back up these settings. Use the following steps to back up your configurations manually.
Create a folder on the local system to store DHCP backup jobs. Note that this folder might exist on the same storage device as the DHCP service, so there is little to no fault tolerance. In this case, your goal is likely to back up the DHCP settings before major configuration changes.

You can run a backup job once you have a secure and available storage location. You won’t be able to name your backup jobs, so strongly consider using subdirectories to organize your files.
To run a DHCP backup, open the DHCP console, right-click the DHCP server node, and select Backup.

Once you select Backup, browse to your storage location and choose OK. The backup job begins.

Since this is a rudimentary backup tool, there are no progress bars or indications when the backup is complete. However, the backup should take less than one minute.
Check the network storage location to confirm that the backup job exists. The file should be very small.
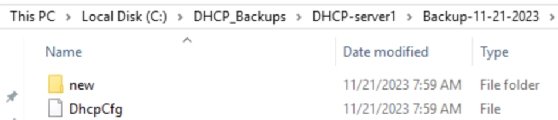
The new directory contains the actual database files for the configuration.

Larger environments might have many DHCP servers. You will likely have a DHCP server at each remote location or branch office. If you manage many DHCP servers, consider a custom console that displays all the DHCP servers you’re responsible for.
Next, it’s a good idea to create a central repository for DHCP backups, preferably on a network share that you also back up regularly. You might make a structure that looks like the following.

You can manually back up any DHCP server to the appropriate subdirectory as needed.
How to restore a DHCP server
Restoring a DHCP server requires one extra step you might not normally consider. You must copy the backup job to the %systemroot%\System32\DHCP\backups folder from the storage repository you created earlier.
For example, if you centralized backups to a network share, you must browse to and select the backup job you want to restore, and copy it to the target DHCP server’s %systemroot%\System32\DHCP\backups directory.
Next, right-click the DHCP server node in the DHCP console and select Restore. Browse to the folder containing your backup, select it, and choose OK. Select Yes when prompted regarding the service restart.

The Restore option automatically browses to the required folder.

Back up DHCP using PowerShell
You can also use PowerShell to back up your DHCP configurations. The process is similar, beginning with a storage location for the backup jobs. The two relevant cmdlets are Backup-DhcpServer and Restore-DhcpServer. Use the -path parameter to identify a storage location.
Here’s a sample PowerShell cmdlet for backing up DHCP.
Backup-DhcpServer -path D:\DHCP_BackupsThe backup process is the same whether you use the graphical console or PowerShell. Modify the above syntax as needed to match your configuration.
Restore the DHCP configuration by specifying the backup name.
Restore-DhcpServer -ComputerName server01 -path C:\Windows\System32\DHCP\backupsRemember to copy the backup job from your storage location to %systemroot%\System32\DHCP\backups before running the command.
Automatic DHCP backup
The Windows Server DHCP service does an automatic backup every 60 minutes. That interval is configurable in the Windows Registry. It uses the same %systemroot%\System32\DHCP\backup storage location that the restore feature expects.
So why might you want to conduct manual backups? Again, perhaps you’re looking to keep backups on a secured portion of the network for increased availability, or you want to store existing settings just before making major changes.
Damon Garn owns Cogspinner Coaction and provides freelance IT writing and editing services. He has written multiple CompTIA study guides, including the Linux+, Cloud Essentials+ and Server+ guides, and contributes extensively to TechTarget Editorial and CompTIA Blogs.