
What are the differences between su and sudo commands?
Let’s say you need to perform an administrative task on your Linux server while adhering to standard security guidelines. What are your options? Three different choices for administrative access exist: Log on as root, i.e., a superuser; switch your identity to root; or execute specific delegated tasks as root. The following summarizes each approach:
- Log on as root. Your initial sign-on to the system is as the root user, granting you unrestricted privileges. This is a poor security practice.
- Log on as a nonprivileged user and switch to root. You sign on as a standard user but use the su — substitute or switch user — command to switch your identity to that of root. Again, you get unrestricted privileges, and again, this is a poor security practice. This process is often phrased as “get root” in documentation.
- Execute delegated tasks with elevated privileges using the sudo — superuser do — command. Your sign-on and system privileges are those of a standard user. However, specific tasks — or, possibly, all tasks — are delegated to this account. Your account is restricted to only those delegated tasks.
This article examines the uses and differences between the su and sudo privilege elevation commands, highlighting examples and some configuration options. It helps you decide which choice is best for your Linux administrative scenarios.
Why not log on as root?
Full root privileges — either via direct logon or su — are problematic. First, when you enter commands as root, the system does not challenge or double-check you. Instead, it does exactly what you tell it to — even if a command brings down the system by making configuration changes or deleting necessary files. The system is, therefore, vulnerable to your mistakes when you’re logged on as root. In addition, applications are designed to run under standard user privileges — not root authority. Bugs and malware are a greater threat to your system when executed with root privileges.
The principle of least privilege applies here: Grant as little authority as needed to accomplish the task.
Still, in some cases, you may decide to “get root” to accomplish your tasks. One way to do that is to log on as a standard user and then switch to the root account. Here’s how.
Use su
One useful Linux feature is the ability to switch from one user account to another without logging off from the initial user. This feature can be extended to include the switched user’s environmental context. The su command is straightforward.
Tip: Keep an eye on the command prompt. The root user’s prompt displays #, and the prompt for nonprivileged users shows $.
Logging on as root, as opposed to switching your identity from an unprivileged user to root, essentially delivers the same results. Either way, your privileges include complete — and potentially dangerous — administrative access.
There are two ways to use the command. The first switches to a new user, encompassing the current user’s context, while the second approach switches to the new user in that user’s own context. The following figures demonstrate the two methods.
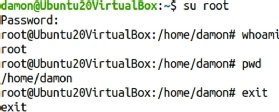
The su root example
With this approach, the command is su, the argument is root and no options are specified. The root password is required. After entering it, you appear to be the root user. However, notice the current working directory. It is the initial user’s own home directory — here, the initial nonprivileged user is user1.
Contrast this with Figure 2.
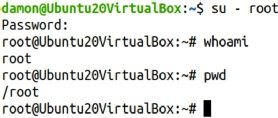
The su – root example
This adds a dash character between the su command and the root argument, changing the user’s context. Note the space on either side of the dash.
Figure 2 shows what it looks like if you run the command and check the current directory.
The difference lies in whether root-specific variables and settings are recognized. I almost never use the su – root syntax. If I’ve already decided to elevate myself to root, I prefer to have a complete root environment.
There is a trick to su, by the way. Since the most common use of su is to switch to root, if you don’t add the root username argument to su, the software assumes you want root.
To that end, the two examples below are the same:
$ su – root
$ su -
Three password challenge scenarios exist with su:
- Standard user to root. You are challenged for the root user password.
- Root to standard user. You are not challenged for the standard user password.
- Standard user to standard user. You are challenged for the password for the user you are switching to.
Delegate with sudo
Consider using sudo — a way to allow a user to temporarily run a program with expanded security privileges — to delegate specific tasks rather than fully elevating privileges to root systemwide. Delegation enables specific tasks to be assigned to specific users or groups. The tasks might normally be performed only by the root user, but with delegation, a standard user is allowed to execute them.
Figure 3 shows examples of using sudo, first without exercising the delegation and then with it.
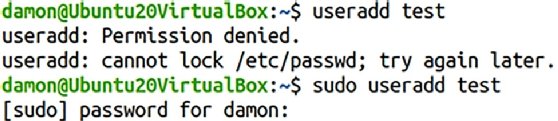
The user’s identity does not change; the specified command was simply run with higher privileges. If the user attempts to use sudo with an undelegated privilege, the user is still denied.
So, how does the sys admin delegate privileges? Use the sudoers file.
The sudoers file
Privilege delegation through sudo is managed in the /etc/sudoers file. You can associate actions and identities to grant specific administrative tasks to specific users.
It’s technically possible to edit the sudoers file with any editor, but it’s strongly encouraged to use the visudo command to launch the editor. The benefit is its syntax checking function. Mistakes in the sudoers file could potentially lead to delegation problems. The visudo editor helps eliminate such mistakes by launching the default text editor for your system — likely either Vim or nano.
Launch the editor with the visudo command:
$ sudo visudo
Notice you need either root privileges or delegated privileges to edit the sudoers file.
The sudoers file is a helpful resource containing many explanations and examples. You should be able to find the syntax for any common delegation. Here are two delegation scenarios you’re likely to implement right away:
- Only user1 is granted the ability to run useradd, usermod and userdel as if they were root: user1 ALL=(root) /usr/sbin/useradd, /usr/sbin/usermod, /user/sbin/userdel.
- Any member of the admins group can run any commands: %admins ALL=(ALL) ALL.
The sudoers file offers many possibilities, far more than this article can cover. Two particular settings, however, stand out. The first manages how long a password authentication is recognized, and the second controls whether delegates are challenged for their password at all.
Extend the sudo password challenge
Typically, users are challenged for their passwords when they execute a delegated command with sudo. Editing the sudoers file lets you manage how long that authentication is valid. If set for a short period of time, the user is challenged frequently, which can be frustrating. Extending the time makes sudo far more convenient to use. This example recognizes the user1 authentication for 30 minutes rather than the default five minutes:
Defaults:user1 timestamp_timeout=30
Use sudo with no password
The normal sudo function challenges users for their passwords — note, this is not the root user password — when they try to exercise a delegated privilege. This setting is a good idea, but it is possible to override it and allow standard users to execute tasks without entering their passwords. Keep in mind: The user already successfully authenticated to the system when logging on.
Bypass the password challenge by adding the NOPASSWD value to the user’s entry in the sudoers file, as seen below:
user1 ALL=(ALL) NOPASSWD:ALL
Sudo logs
Another sudo benefit is that it logs its use. When users exercise privileges, sudo logs the commands. The location of the log files varies by distribution. For Red Hat Enterprise Linux-based distributions, check /var/log/security; for Ubuntu, see var/log/auth.log.
Manage administrative privileges
This article discusses “the user” as if they are some anonymous third person. In reality, the settings in the sudoers file frequently apply to you. Often, administrators configure their own servers via sudo to let them exercise delegated tasks on their own systems. Because of this, values such as timeout and password are settings you may have to live with on a regular basis.
In fact, many Linux distributions disable the root user account by default, enforcing the sudo structure to complete administrative tasks. Ubuntu Linux is one of these, for example.
It’s generally not a good idea to log on to a Linux server as root, so when considering su and sudo, get comfortable with using sudo to exercise specific privileges on the system and limit your use of su – root to help mitigate the threat of mistakes and malware.